Trim Wheel V1 Setup Instructions
*** Installation Instructions for Trim Wheels shipped FROM FLIGHT VELOCITY before 1/1/21 ***
Choose below for instructions on Trim Wheels shipped AFTER 1/1/21
Microsoft Flight Simulator 2020:
For the moment, FS2020 doesn't know how to map the trim wheel to the elevator pitch trim, but it does see the hardware. That means you just have to map the buttons yourself - here's how:
Click Options >Controls
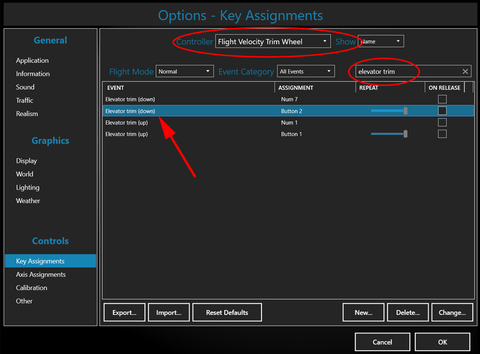
Next, select "FLIGHT VELOCITY TRIM WHEEL"
Then under the filter options, be sure to show 'all" controls, not just "assigned"
In the search box type "elevator trim" to show the elevator trim options as seen below
Next, we'll assign the nose up and nose down commands to the trim wheel up and down motions. For nose up, select input 1 from the drop-down, then click validate.
For nose down, select input 2 from the drop-down, then click validate.
The resulting configuration should look like the screen below
Then click the "Save and Apply" button. You're done, now go fly!
X-Plane:
UPDATE - The files shown below will be included with X-Plane 11 beginning with version 11.50. This means that once 11.50 is released, you will no longer need to follow these instructions (The files are already in the latest betas).
- Plug the trim wheel into an available USB port, preferably into the computer directly or a powered USB hub. Do not use the USB ports on the back of the Logitech/Saitek yoke. The computer will automatically recognize the trim wheel.
- Download these two files and copy them into your "\X-Plane 11\Resources\joystick configs" folder. (NOTE: your X-Plane folder could be on your desktop, in your C:\ drive, or some other location you specified during the X-Plane installation process)
- Flight Velocity Elevator Trim.joy
- Flight Velocity Elevator Trim.png (right-click > Save link as...)
- Start X-Plane, it should recognize the new hardware and prompt you to configure it (If not, click on Settings > Joystick). If desired, you can change the assignments at this time. Search for "Pitch trim" in the search box, then assign the pitch trim up and down to the direction of the wheel you wish to assign those actions.
- Click Apply, Done, then go fly!


Prepar3D:
- Plug the trim wheel into an available USB port, preferably into the computer directly or a powered USB hub. Do not use the USB ports on the back of the Logitech/Saitek yoke. The computer will automatically recognize the trim wheel.
- Start Prepar3D and click Options > Key Assignments
- Ensure that you have "Flight Velocity Trim Wheel" selected as your controller, then search for "Elevator Trim" in the search box.
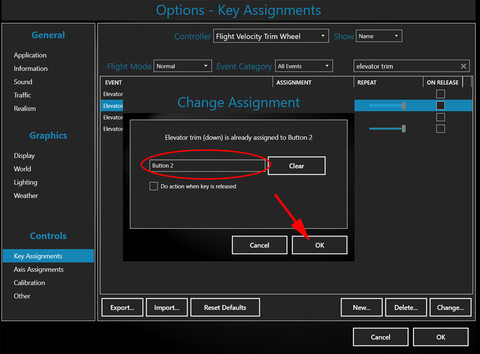
- Assign the pitch trim up and down to the direction of the wheel you wish to assign those actions.
- Click Ok > Ok, then go fly!
About trim wheel speed / sensitivity
The trim wheel itself does not have user-configurable sensitivity adjustments. However, you can adjust the trim wheel speed in the configuration of the particular aircraft you're flying. You will need to make this adjustment for every aircraft you fly, this is not a global adjustment. Here's how:
Microsoft Flight Simulator 2020:
There are no sensitivity adjustments for MF2020 at this time, however a workaround using FSUIPC has been discussed here.
X-Plane:
To adjust the trim speed in the just edit the "trim_time" variable in the .acf file of the aircraft you're flying.
For example, to change the elevator trim speed in the default 172, follow these steps:
- Navigate to "Your File Path"\X-Plane 11\Aircraft\Laminar Research\Cessna 172SP"
- Open the file "Cessna_172SP.acf" with a text editor and search for the variable "acf/_elev_trim_time" in the file
- Adjust the number smaller to increase the sensitivity of the elevator trim
- Save the file and restart the simulator.
Prepar3D/FSX:
To adjust the trim speed in the just edit the "elevator_trim_effectiveness" variable in the aircraft.cfg file of the aircraft you're flying.
For example, to change the elevator trim speed in the default Mooney Acclaim (P3D), follow these steps:
- Navigate to "C:\Program Files\Lockheed Martin\Prepar3D v5\SimObjects\Airplanes\Mooney_Acclaim"
- Open the file "aircraft.cfg" with a text editor and search for the variable "elevator_trim_effectiveness" in the file
- Adjust the number smaller to increase the sensitivity of the elevator trim.
- Save the file and restart the simulator.